Installing the Webcam 7 Pro is a straightforward process that requires minimal technical knowledge. Whether you’re setting up the webcam for video conferencing, online classes, live streaming, or content creation, the Webcam 7 Pro is designed to work quickly through a simple plug-and-play connection.
This guide walks you through the installation process step by step and provides troubleshooting tips to help you get started without frustration.
Table of Contents
ToggleWhat You’ll Need
Before installing the Webcam 7 Pro, make sure you have the following:
| Requirement | Details |
|---|---|
| Webcam 7 Pro | USB Webcam Device |
| Computer | Windows, macOS, or Linux PC |
| USB Port | Available USB 2.0 or USB 3.0 Port |
| Internet Connection | Optional for software updates |
| Video Calling App | Zoom, Skype, Teams, Google Meet, etc. |
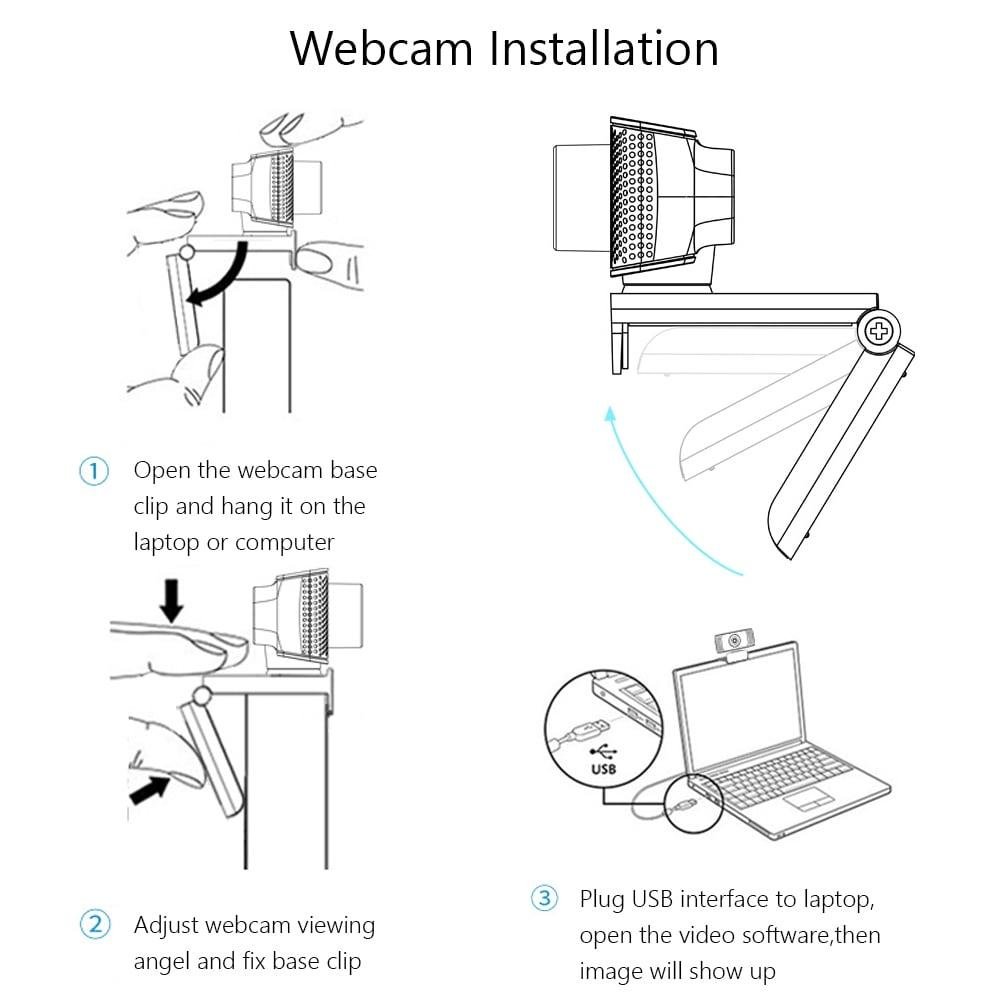
Step 1: Unbox the Webcam
Carefully remove the Webcam 7 Pro from its packaging. Most packages include:
- Webcam 7 Pro device
- User manual
- USB cable (attached or included)
- Mounting clip
Inspect the webcam for any visible damage before installation.
Step 2: Connect the Webcam
Locate an available USB port on your computer and plug in the webcam.
Modern operating systems usually detect the Webcam 7 Pro automatically. Within a few seconds, your computer should recognize the device and install the necessary drivers.
Installation Time
| Operating System | Average Setup Time |
|---|---|
| Windows 11 | 10–30 Seconds |
| Windows 10 | 10–30 Seconds |
| macOS | 15–45 Seconds |
| Linux | 15–60 Seconds |
Step 3: Position the Webcam
Place the Webcam 7 Pro on top of your monitor or laptop screen using the built-in mounting clip.
For the best video quality:
- Position the webcam at eye level.
- Ensure good lighting in front of your face.
- Avoid strong backlighting from windows.
- Keep the camera lens clean.
Proper positioning can dramatically improve your appearance during video calls and recordings.
Step 4: Test the Webcam
After connecting the device, test it using your computer’s camera application.
On Windows
- Click the Start Menu.
- Open the Camera app.
- Verify that the webcam image appears.
On macOS
- Open FaceTime or Photo Booth.
- Select the Webcam 7 Pro if necessary.
- Confirm that video is displayed correctly.
If the camera feed appears, the installation was successful.
Step 5: Configure Video Applications
Most communication platforms automatically detect the Webcam 7 Pro.
Common applications include:
- Zoom
- Microsoft Teams
- Skype
- Google Meet
- Discord
- OBS Studio
Open the application’s video settings and select Webcam 7 Pro as your preferred camera if it isn’t chosen automatically.
Troubleshooting Common Issues
Webcam Not Detected
Try these solutions:
- Disconnect and reconnect the USB cable.
- Use a different USB port.
- Restart your computer.
- Check Device Manager on Windows for hardware issues.
No Video Display
Possible fixes include:
- Ensure another application isn’t using the webcam.
- Update your operating system.
- Verify camera permissions in system settings.
Poor Video Quality
To improve image quality:
- Increase room lighting.
- Clean the camera lens.
- Update webcam drivers if available.
Tips for Best Performance
| Tip | Benefit |
|---|---|
| Use natural lighting | Better image quality |
| Keep lens clean | Sharper video |
| Position webcam at eye level | More professional appearance |
| Close unused apps | Better performance |
| Use a stable internet connection | Smoother video calls |
Final Thoughts
The Webcam 7 Pro is designed to make installation simple and hassle-free. Thanks to its plug-and-play functionality, most users can complete setup in just a few minutes without downloading extra software. Once installed, the webcam works seamlessly with popular video conferencing and streaming platforms.
By following the steps in this guide, you can quickly configure your Webcam 7 Pro and enjoy clear, reliable video for meetings, online classes, streaming, and everyday communication.